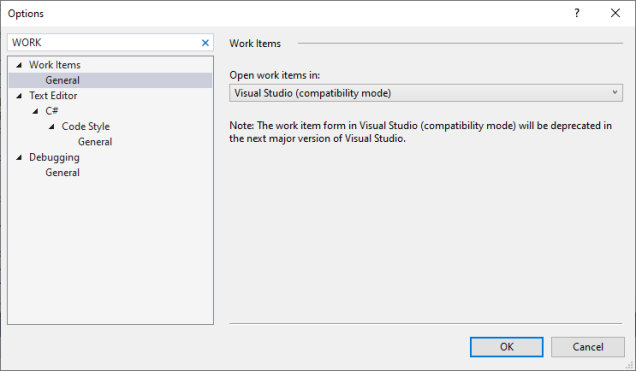
Open “Tools/Options” and search for “Work Items” tab.
Select “Visual Studio (compatibility mode).
Open “Tools/Options” and search for “Work Items” tab.
Select “Visual Studio (compatibility mode).
This wrapper is used to represent nullable types.
Example
#include <iostream>
#include <optional>

void f1(std::optional<std::string> v)
{
  std::cout << v.has_value() << std::endl;
}

int main()
{
  f1(std::nullopt);
  f1("assigned");
  return 0;
}
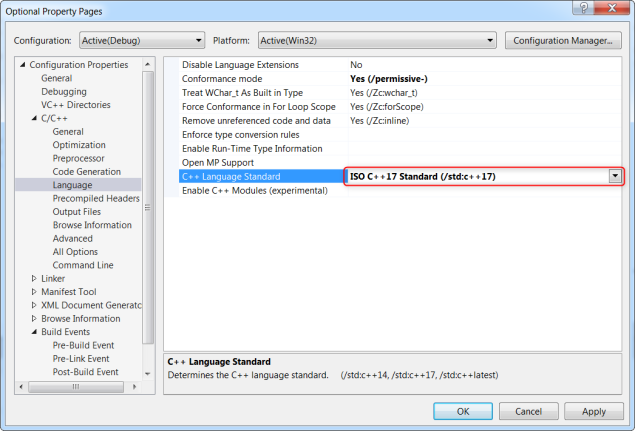
To build the example in VS C++17 should be enabled.
Create XSD-definition of classes containing data.
Example
<xs:complexType name="ParagraphExtractorType">
  <xs:complexContent>
    <xs:extension base="htmlCleanup:TextProcessorType">
      <xs:sequence>
      </xs:sequence>
    </xs:extension>
  </xs:complexContent>
</xs:complexType>
Create XSD-definition of container class representing entire data.
Example
<xs:element name="HTMLCleanupConfig">
  <xs:complexType>
    <xs:sequence>
      <xs:element name="TextProcessorConfig"
        type="htmlCleanup:TextProcessorType">
      </xs:element>
      <xs:element name="ParagraphExtractorConfig"
        type="htmlCleanup:ParagraphExtractorType">
      </xs:element>
      <xs:element name="SpecialHTMLRemoverConfig"
        type="htmlCleanup:SpecialHTMLRemoverType">
      </xs:element>
      <xs:element name="InnerTagRemoverConfig"
        type="htmlCleanup:InnerTagRemoverType">
      </xs:element>
      <xs:element name="TagWithTextRemoverConfig"
        type="htmlCleanup:TagWithTextRemoverType">
      </xs:element>
      <xs:element name="URLFormatterConfig"
        type="htmlCleanup:URLFormatterType">
      </xs:element>
      <xs:element name="TextFormatterConfig"
        type="htmlCleanup:TextFormatterType">
      </xs:element>
    </xs:sequence>
  </xs:complexType>
</xs:element>
Generate classes from XSD-schema.
How to create classes from XSD-schema with Visual Studio?
Example
[System.CodeDom.Compiler.GeneratedCodeAttribute("xsd", "4.6.1055.0")]
[System.SerializableAttribute()]
[System.Diagnostics.DebuggerStepThroughAttribute()]
[System.ComponentModel.DesignerCategoryAttribute("code")]
[System.Xml.Serialization.XmlTypeAttribute(AnonymousType=true,
  Namespace="urn:xmlns:HTMLCleanupConfig")]
[System.Xml.Serialization.XmlRootAttribute(
  Namespace="urn:xmlns:HTMLCleanupConfig", IsNullable=false)]
public partial class HTMLCleanupConfig {
  private TextProcessorType textProcessorConfigField;
  private ParagraphExtractorType paragraphExtractorConfigField;
  private SpecialHTMLRemoverType specialHTMLRemoverConfigField;
  private InnerTagRemoverType innerTagRemoverConfigField;
  private TagWithTextRemoverType tagWithTextRemoverConfigField;
  private URLFormatterType uRLFormatterConfigField;
  private TextFormatterType textFormatterConfigField;

/// <remarks/>
public TextProcessorType TextProcessorConfig {
  get {
    return this.textProcessorConfigField;
  }
  set {
    this.textProcessorConfigField = value;
  }
}

/// <remarks/>
public ParagraphExtractorType ParagraphExtractorConfig {
  get {
    return this.paragraphExtractorConfigField;
  }
  set {
    this.paragraphExtractorConfigField = value;
  }
}

/// <remarks/>
public SpecialHTMLRemoverType SpecialHTMLRemoverConfig {
  get {
    return this.specialHTMLRemoverConfigField;
  }
  set {
    this.specialHTMLRemoverConfigField = value;
  }
}

/// <remarks/>
public InnerTagRemoverType InnerTagRemoverConfig {
  get {
    return this.innerTagRemoverConfigField;
  }
  set {
    this.innerTagRemoverConfigField = value;
  }
}

/// <remarks/>
public TagWithTextRemoverType TagWithTextRemoverConfig {
  get {
    return this.tagWithTextRemoverConfigField;
  }
  set {
    this.tagWithTextRemoverConfigField = value;
  }
}

/// <remarks/>
public URLFormatterType URLFormatterConfig {
  get {
    return this.uRLFormatterConfigField;
  }
  set {
    this.uRLFormatterConfigField = value;
  }
}

/// <remarks/>
public TextFormatterType TextFormatterConfig {
  get {
    return this.textFormatterConfigField;
  }
  set {
    this.textFormatterConfigField = value;
  }
}
}
Create class implementing methods for serialization / deserialization of container object.
Example
public void Deserialize(string fileName)
{
  var config = new HTMLCleanupConfig();
  using (var reader = new StreamReader(fileName))
  {
    var serializer = new XmlSerializer(typeof(HTMLCleanupConfig));
    config = (HTMLCleanupConfig)serializer.Deserialize(reader);
  }
}

public void Serialize(string fileName)
{
  var config = new HTMLCleanupConfig();
  using (var writer = new StreamWriter(fileName))
  {
    var serializer = new XmlSerializer(typeof(HTMLCleanupConfig));
    serializer.Serialize(writer, config);
  }
}
Examples are taken from pdf service .
Open Developer Command Prompt for Visual Studio and execute
> xsd xsd_file_name /classes /namespace:resulting_namespace
For example
> xsd config.xsd /classes /namespace:HTMLCleanup.Config
As result you will get config.cs containing set of classes having structure according to XSD-description.
XML Schema Definition Tool (Xsd.exe)
This can happen after cleaning up the solution. One of possible reason is that project is not included into build for selected platform, please check configuration manager settings.
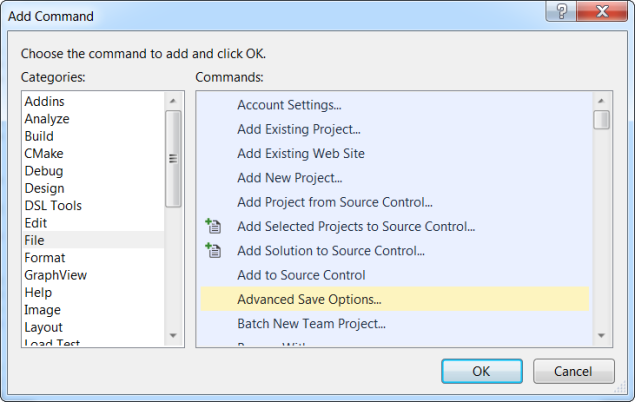
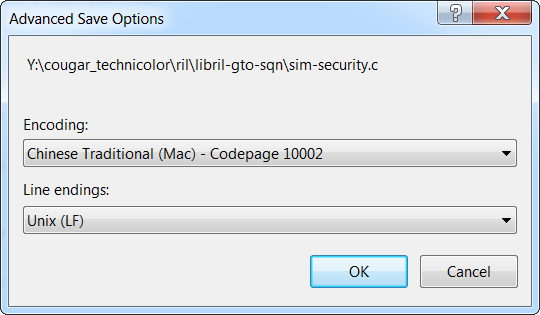
Open “Tools” -> “Customize” -> “Commands” and select the “File” item.
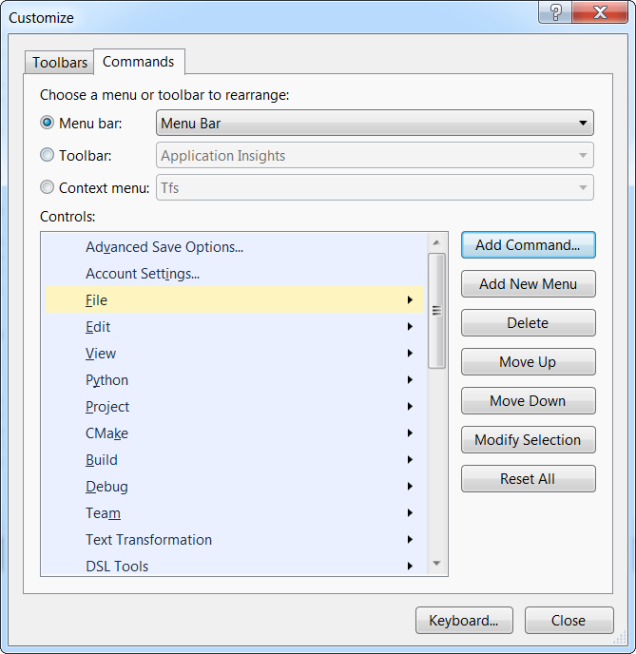
Press “Add Command…” button and add “Advanced Save Options…” item to the “File” menu.
Select “Advanced Save Options” menu and set up the “Line endings” drop-down.
Create resulting files, include them into project. Example below shows cshtml files but they can be text files of any type. Create files with names build and version. Initialize them with desired starting build value and version string.
Create bat-file _update_version.bat and add it to the pre-build event in project properties of Visual Studio.
cd $(ProjectDir)
_update_version.bat
An example of bat-file.
@set _date=%date%
@set _time=%time:~0,8%
@set _year=%_date:~10,4%

@rem reads build number from file
@set /p _build=< build
@rem increments build number
@set /a _build=%_build%+1
@rem saves build number into file
@echo %_build%>build

@rem fills resulting files
@echo %_build%>Views/Shared/Build.cshtml
@echo %_year%>Views/Shared/Year.cshtml
@echo %date% %_time%>Views/Shared/Date.cshtml

@rem cleans variables
@set _build=
@set _date=
@set _time=
@set _year=
Rebuild project.
How to fill revision number with TortoiseSVN and Visual Studio
Create template file and resulting file, include resulting file into project. Example below shows cshtml files but they can be text files of any type.
Create bat-file _update_version.bat and add it to the pre-build event in project properties of Visual Studio.
cd $(ProjectDir)
_update_version.bat
Use subwcrev utility provided by TortoiseSvn.
An example of bat-file.
subwcrev . Views\Mobile\AboutTmpl.cshtml Views\Mobile\About.cshtml
set ERRORLEVEL=0
Put into template files keywords which will be replaced by subwcrev utility
Rev. $WCREV$
Last updated $WCDATE=%d %b %Y at %H:%M:%S$
Rebuild project.
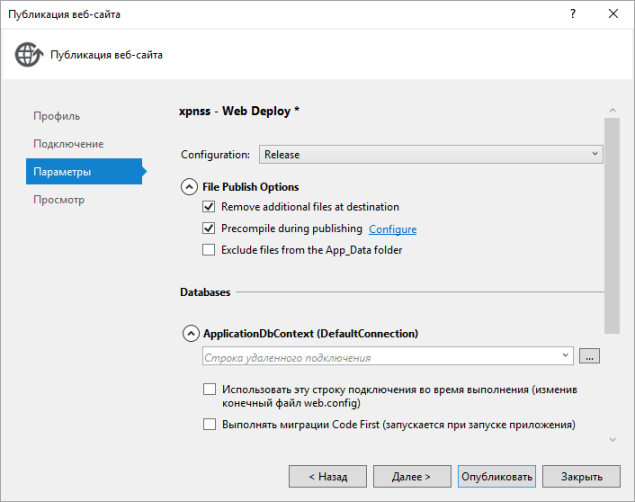
Clean checkbox “Precompile during publishing”.

![]()

You must be logged in to post a comment.